
Configuring Performance Thresholds and Baselines in Carrier - Step-by-Step Guide
This user-friendly guide aims to help you efficiently configure performance thresholds and baselines in Carrier for your performance tests, resulting in reduced analysis time. By following these steps, you can easily receive email notifications with comparisons to baselines and thresholds, ensuring increased visibility and transparency. Based on configured SLAs, the build status is available inside the backend tests table in the Carrier UI after the tests.
Note: You need to configure Email integration inside the project first. Carrier has default templates for email notifications that can be overridden. You can upload your own inside Carrier “Email” integrations.
Options for Thresholds and Baselines
- Thresholds: Set thresholds for various performance metrics like throughput and response time. Define the threshold values based on your application’s performance requirements and SLAs.
All test
Error ratethreshold > 10 (%)Note: The total error rate should be less than 10%. If it exceeds 10 percent + deviation, the build will fail.
All test
Throughput< 3 requests per secondNote: The total throughput should be more than 3 requests per second. If it is less than 3 requests + deviation, the build will fail.
Individual
Response Time> 3000 milliseconds (3 seconds)Note: Every request’s response time should be less than 3000 milliseconds. If it exceeds 3000 milliseconds + deviation, the build will fail.
- Baseline: Setting baselines allows you to compare test results against a predefined performance standard. Choose the appropriate baseline for your test to assess deviations from expected performance.
By following these steps and configuring thresholds and baselines, you can easily track the performance of your application and identify areas for improvement to deliver optimal user experiences.
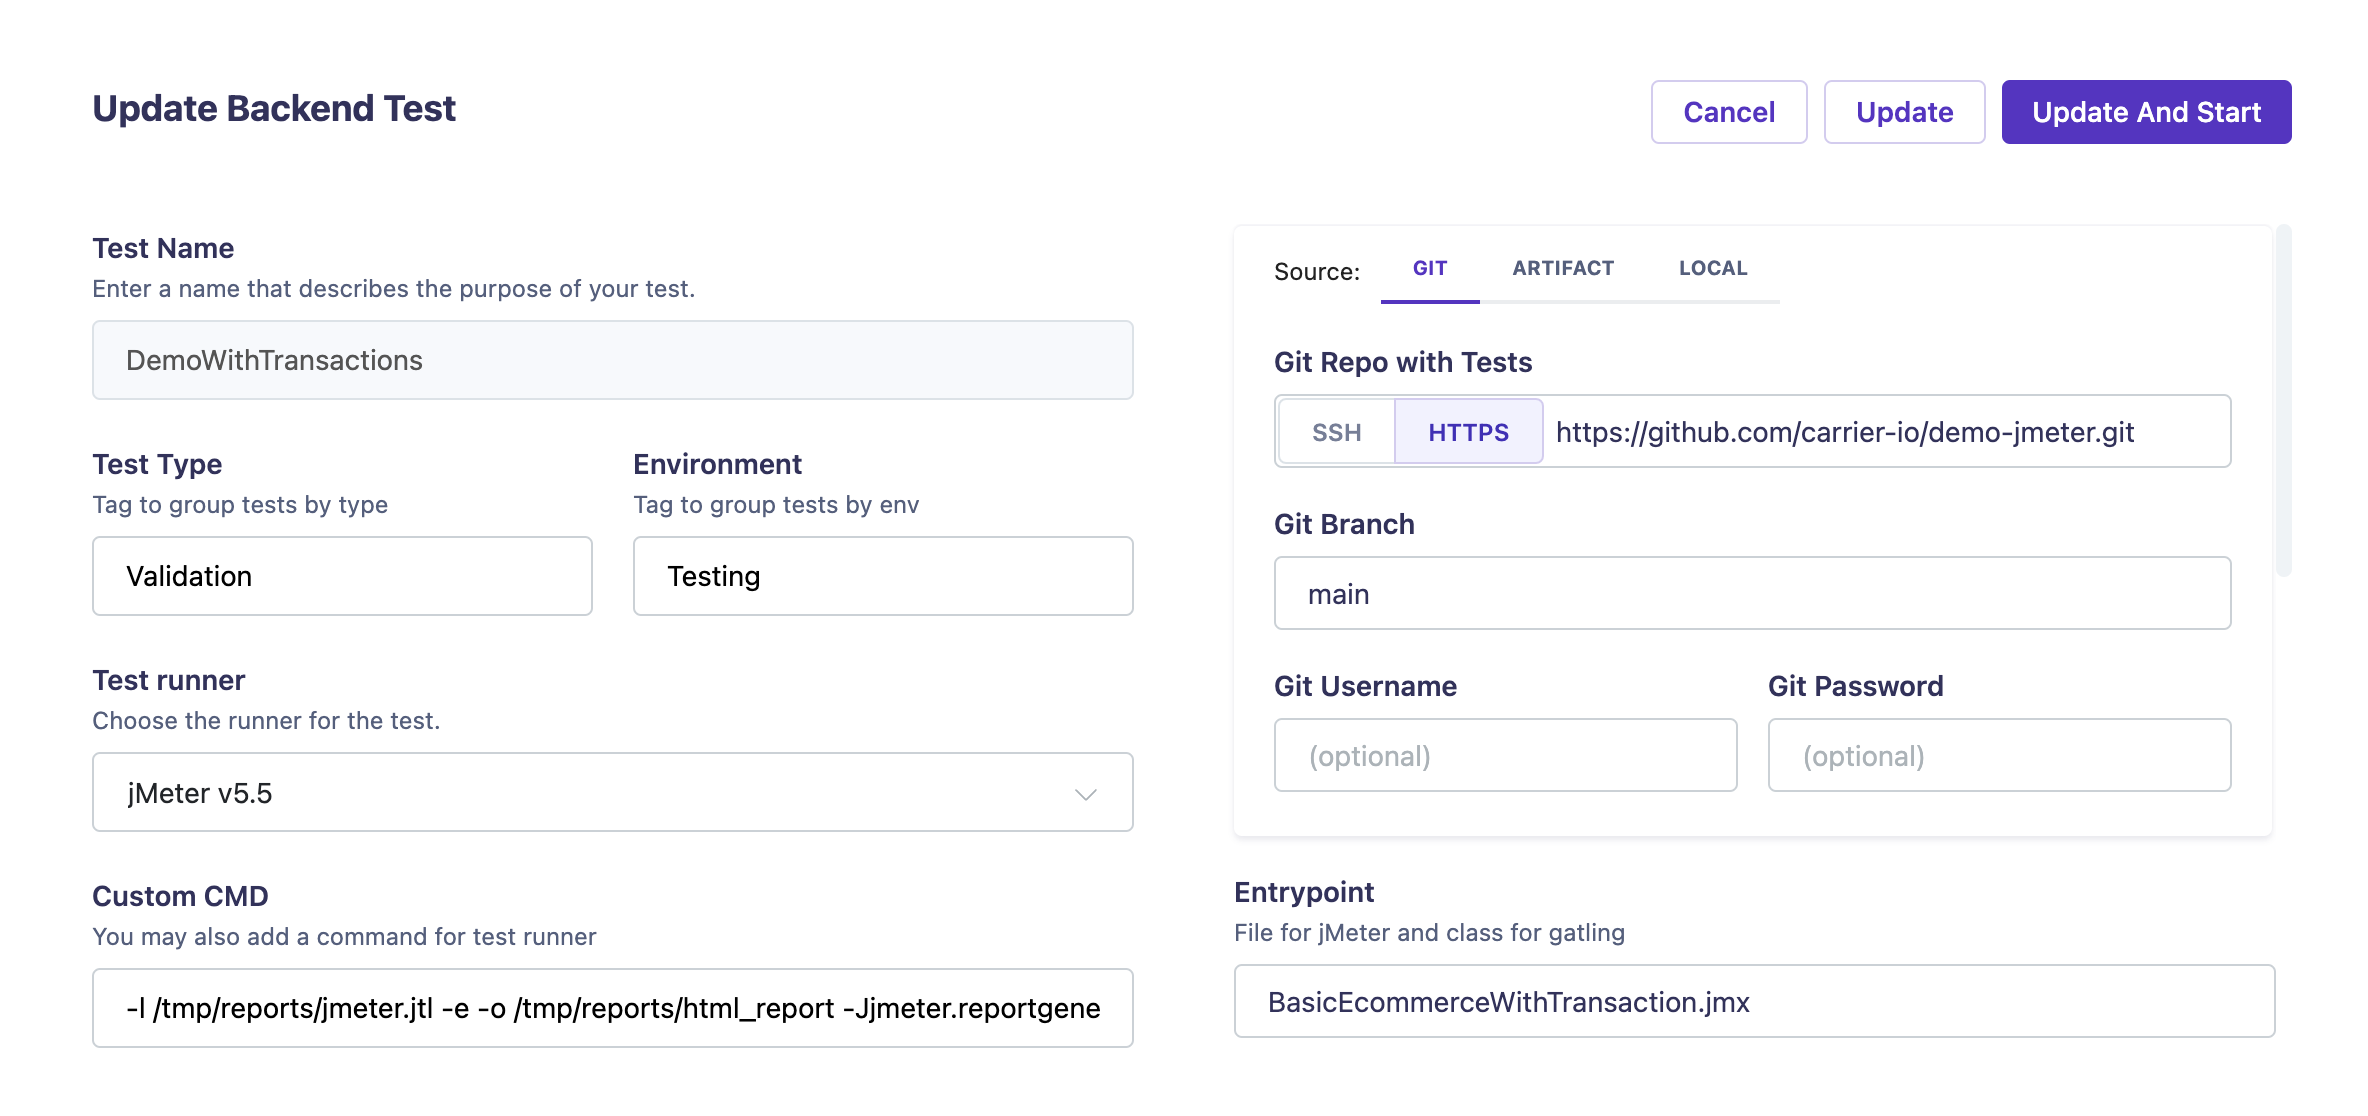
Step 0: Open Test Parameters
- Open your test “Settings” with the desired name (e.g., “DemoWithTransactions”).
- Set or collect the following test parameters:
- Test Type: Choose the appropriate test type (e.g., Validation).
- Environment: Specify the environment for the test (e.g., Testing).
![Add Backend Test]()
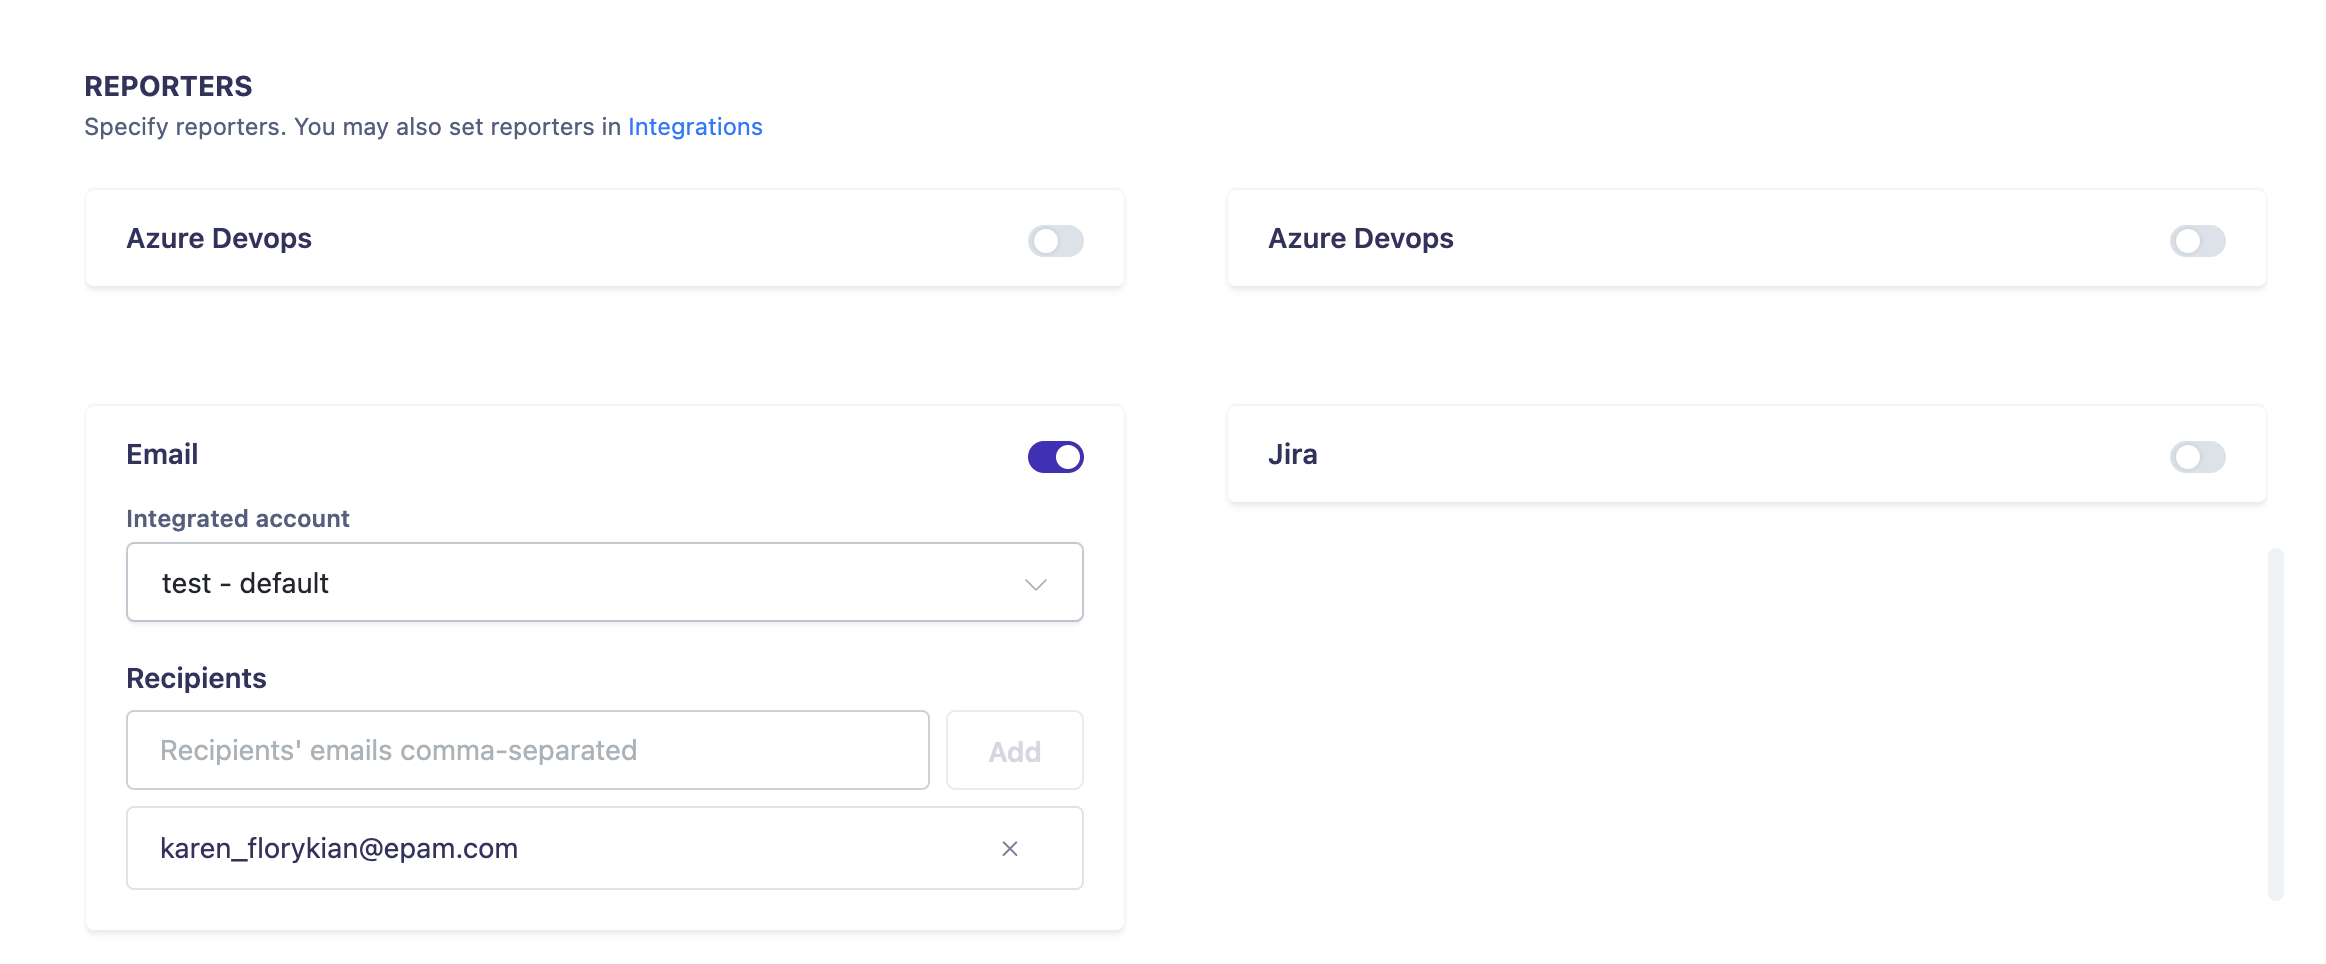
- VUSERS: Set the number of virtual users for the test.
- EMAIL: Set the email recipients’ addresses for the test.
![Add Backend Test]()
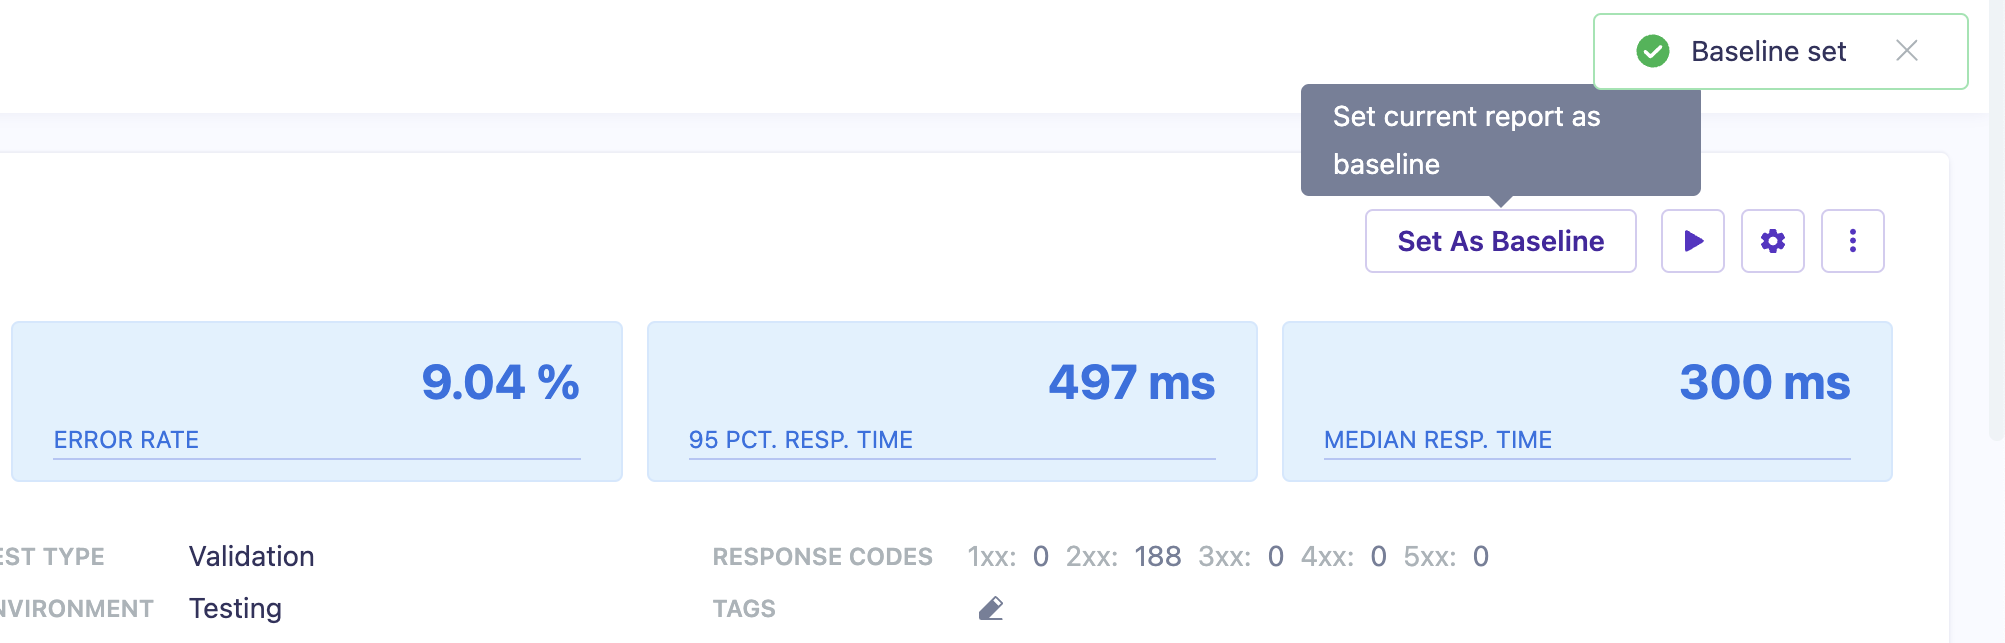
Step 1: Set the Baseline for Comparison
- Run the “DemoWithTransactions” tests with parameters from “Step 0: Open Test Parameters”.
- Set the test run as a “Baseline”.
![Set Baseline]()
![Baseline]()
![Baseline]()

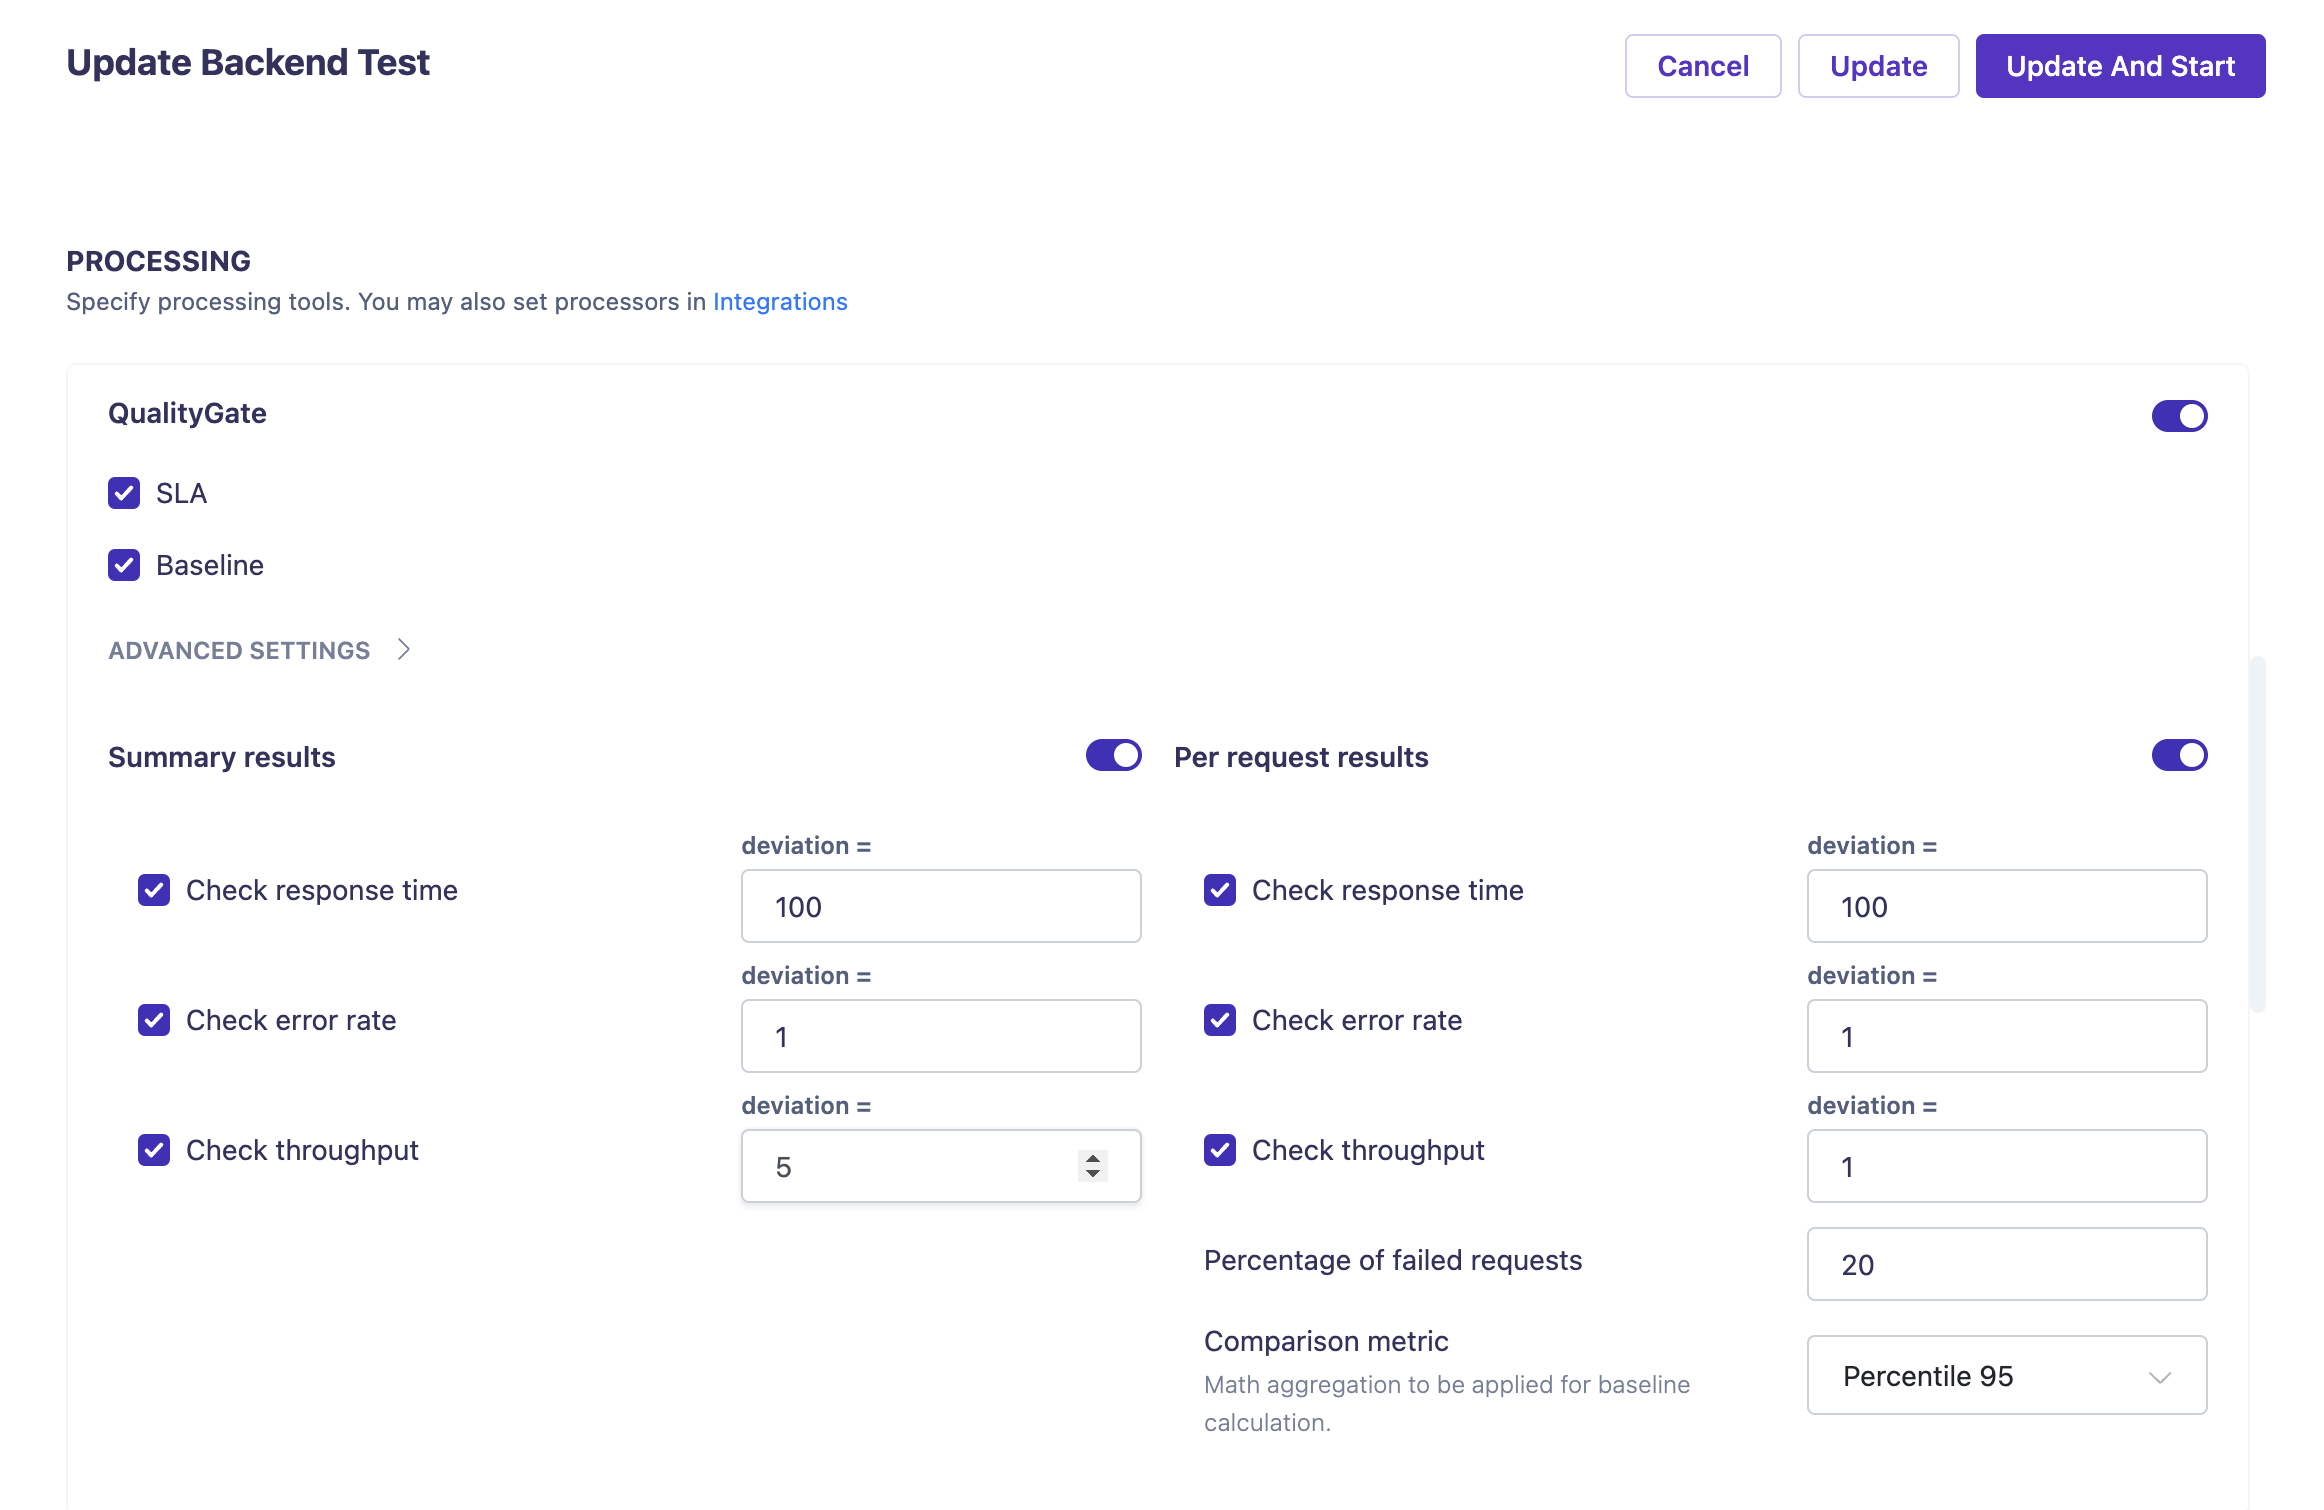
Step 2: Enable Baseline QualityGate Checkbox
- Open the “DemoWithTransactions” test “Settings”.
- Turn on the PROCESSING -> QualityGate checkbox if enabled.
- Activate the Baseline checkbox.
- Expand the PROCESSING -> ADVANCED SETTINGS section.
- Activate the “Summary results” checkbox. There are three more checkboxes:
- Check response time (in milliseconds)
- Check error rate (% of all errors)
- Check throughput (req/sec rate from all requests)
- Activate the “Per request results” checkbox. There are three checkboxes and two fields:
- Check response time (in milliseconds)
- Check error rate (% of errors for each request)
- Check throughput (req/sec rate from each request)
- Percentage of failed requests (% of all errors)
- Comparison metric (You can chose from: Maximum, Minimum, Average, Percentie 95 and Percentie 50)
- Set the “Check throughput” deviation value (e.g., 5).
![Enable Comparison]()
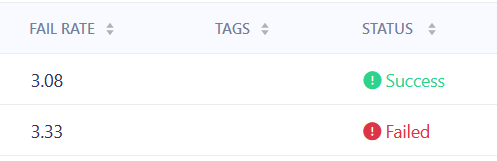
Note: Deviation boxes are used to specify the acceptable level of differences to not fail the build. (In example below, threshold for fail rate is 3 with 0.25 diviation, so the first bild is success and the last one failed)
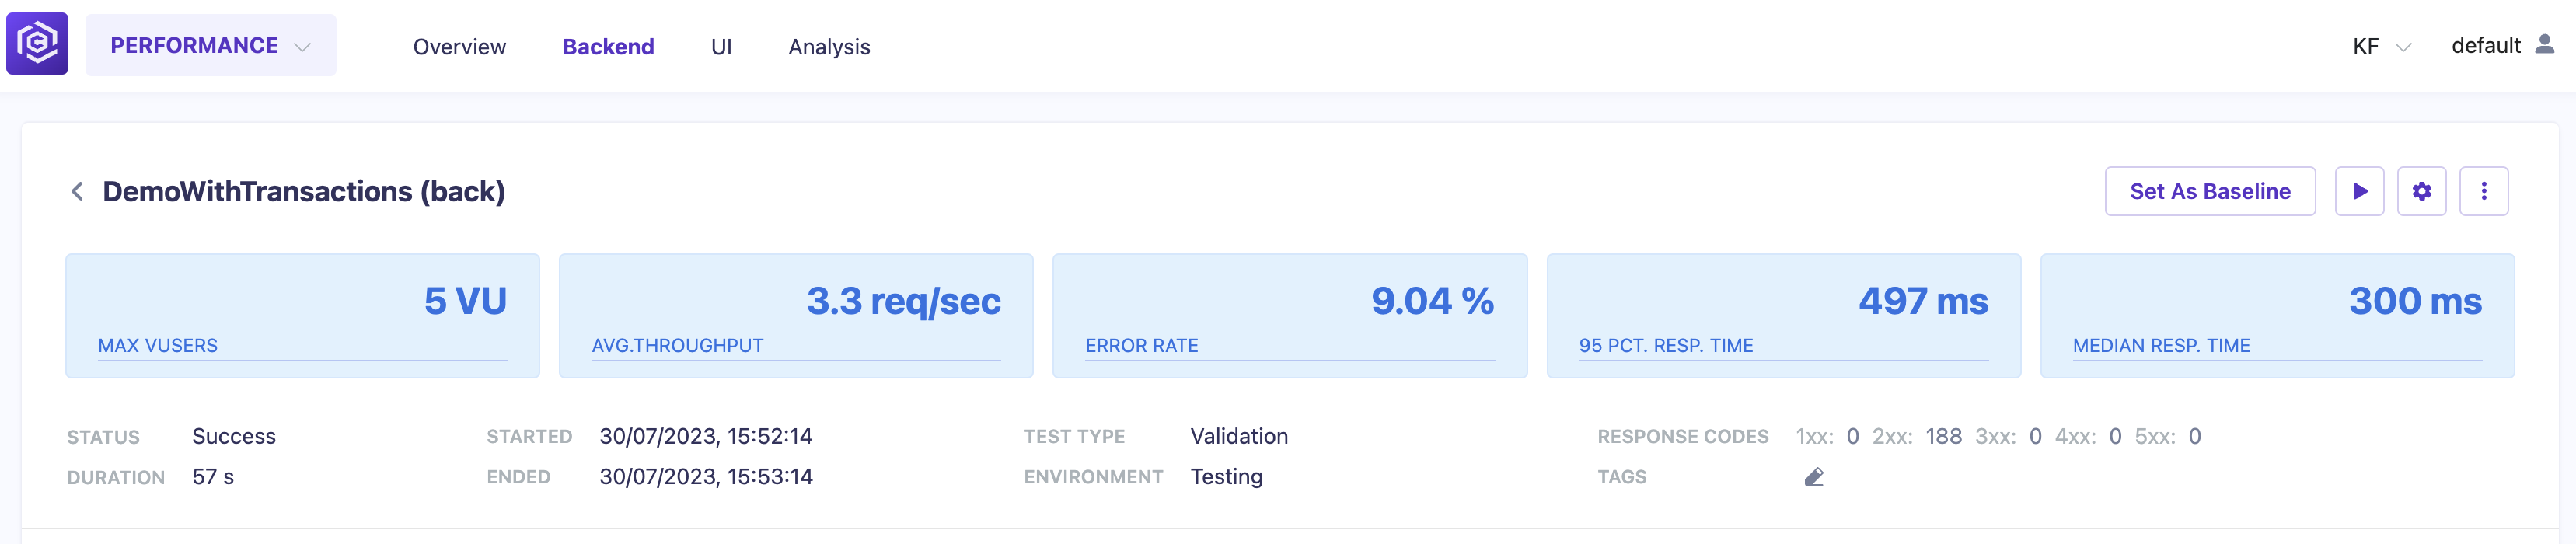
Step 3: Start the Test Run
- Click on the “Update And Start” button at the top of the page to start the test run.
- Check the build status after the test.
![Build Status]()
- Check the email notification.
![Status Email]()

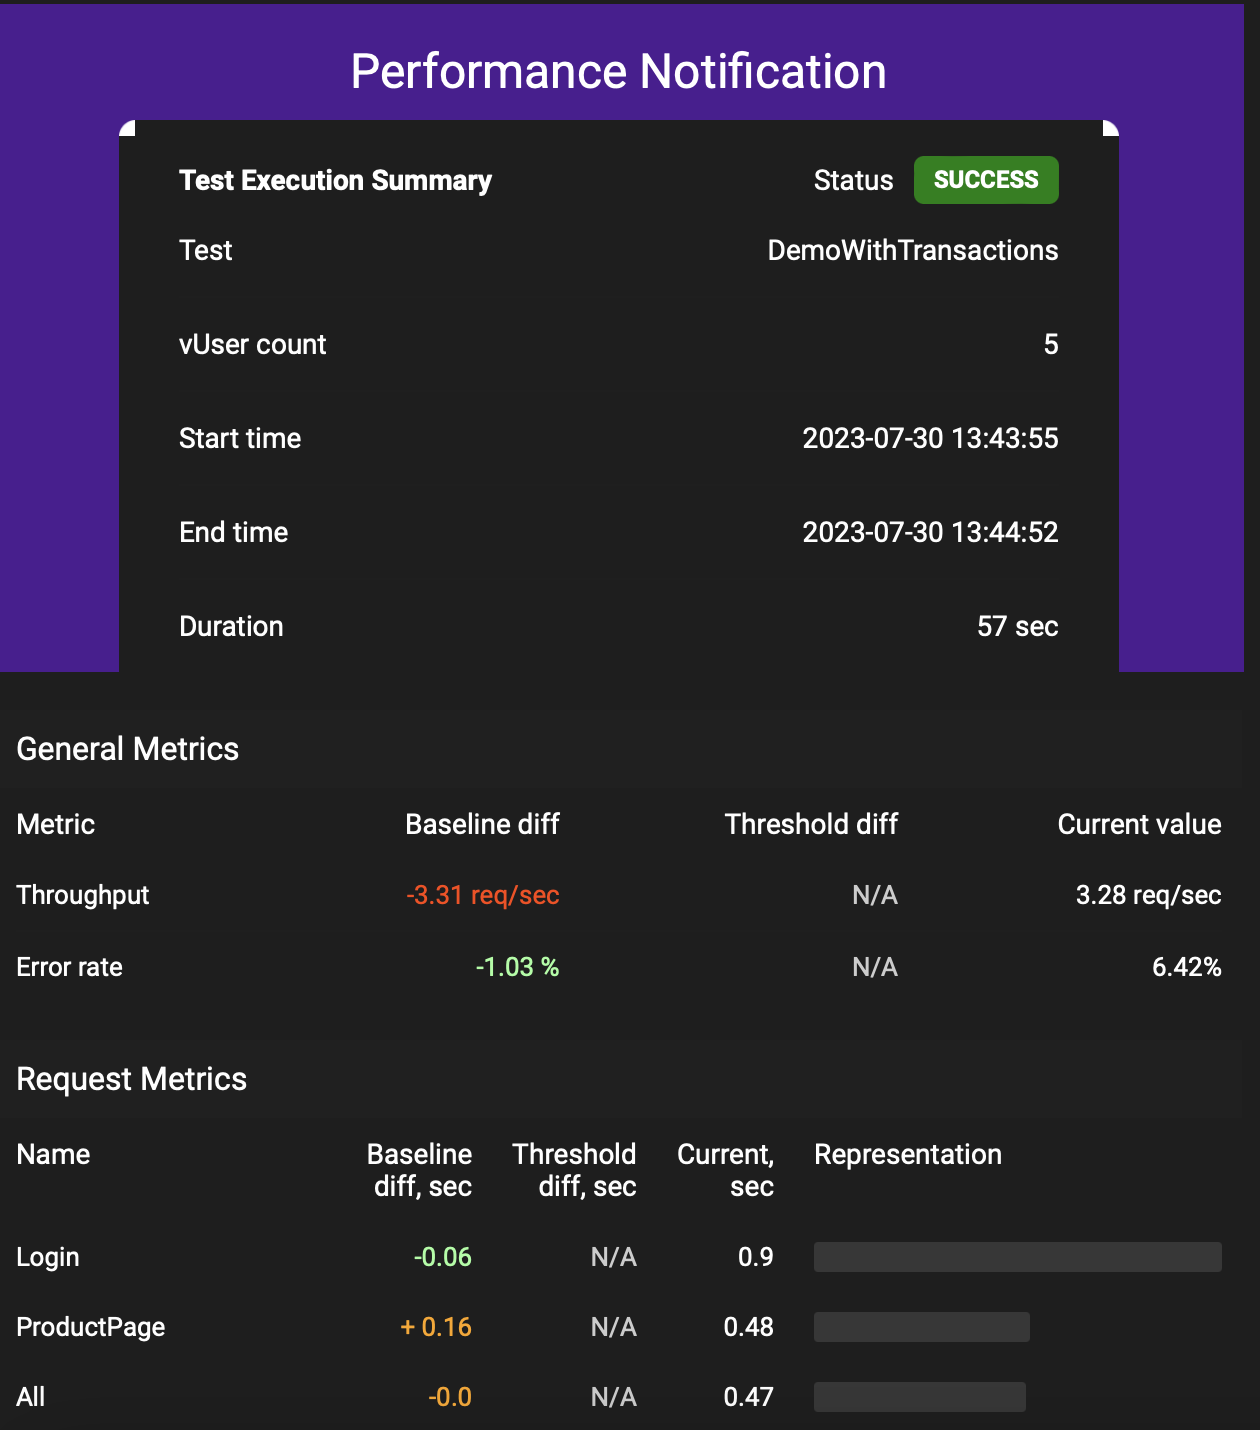
Step 4: Get Test Metrics
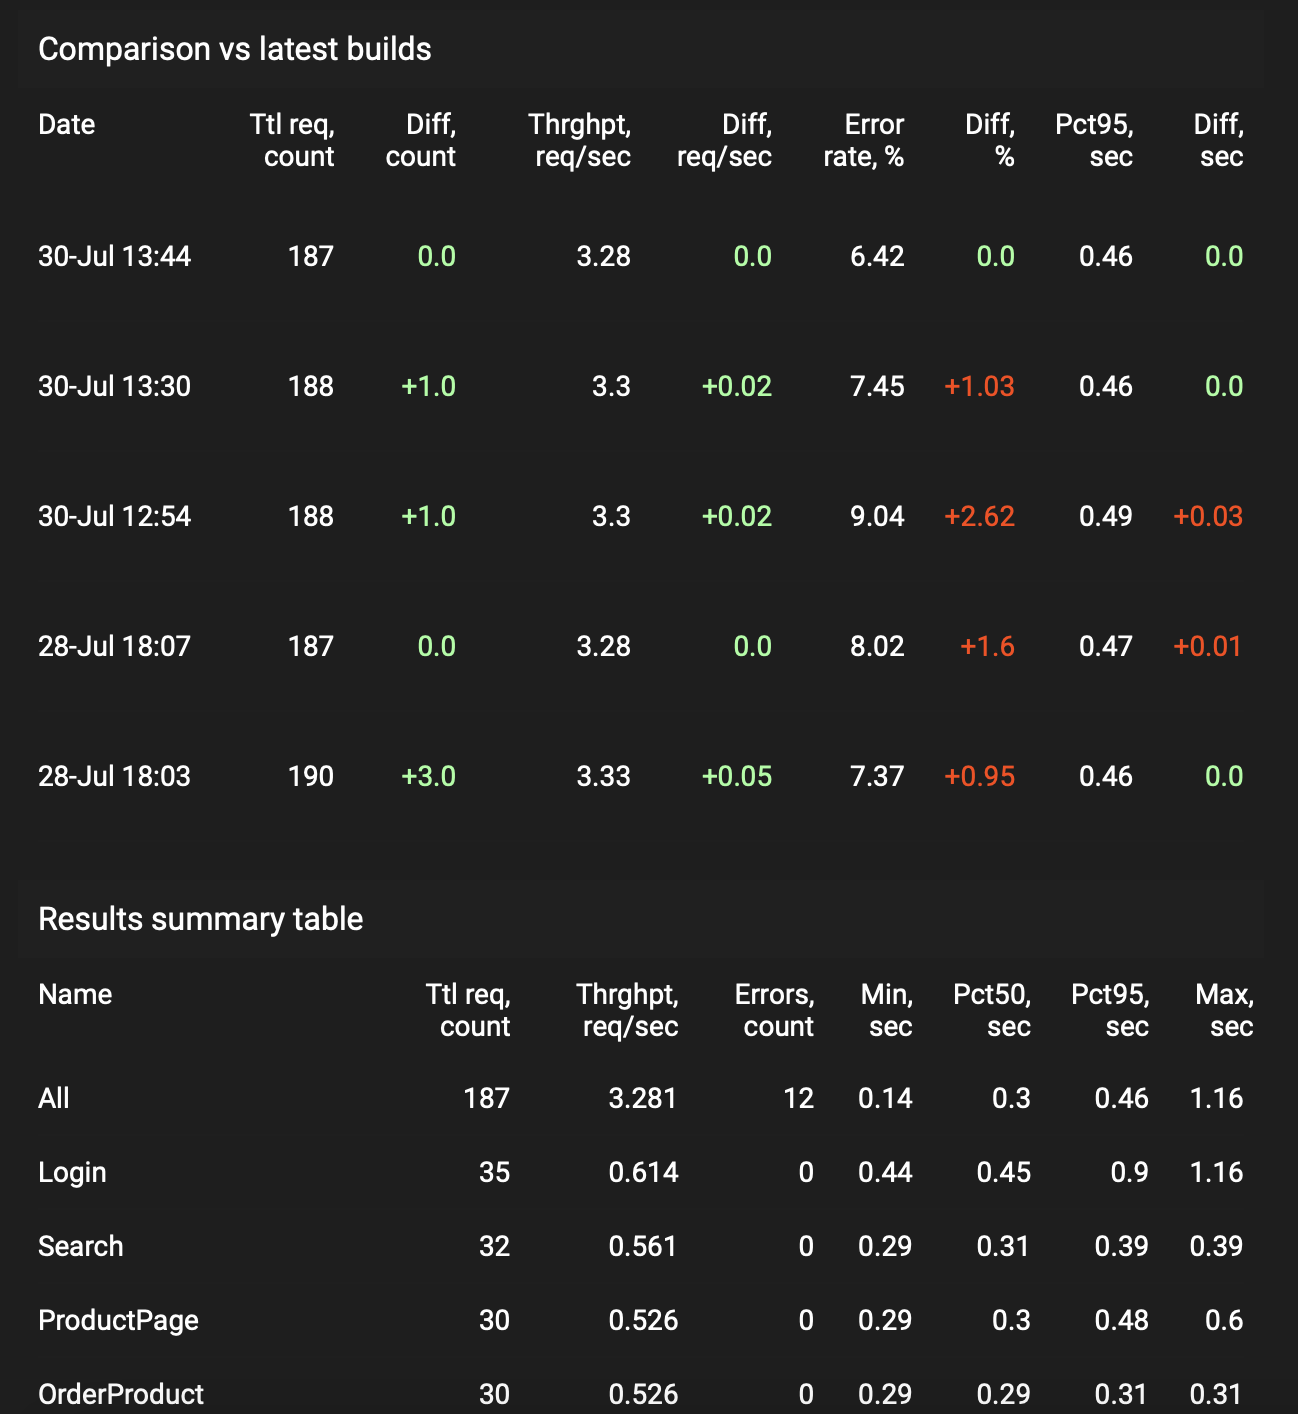
- After the test run is completed, you will receive an email with the following test metrics comparison to the Baseline:
- Ttl (total requests)
- Thrghpt (throughput total), req/sec
- Error rate, %
- Pct95 (response by 95th percentile max), seconds
![Summary Comparison]()
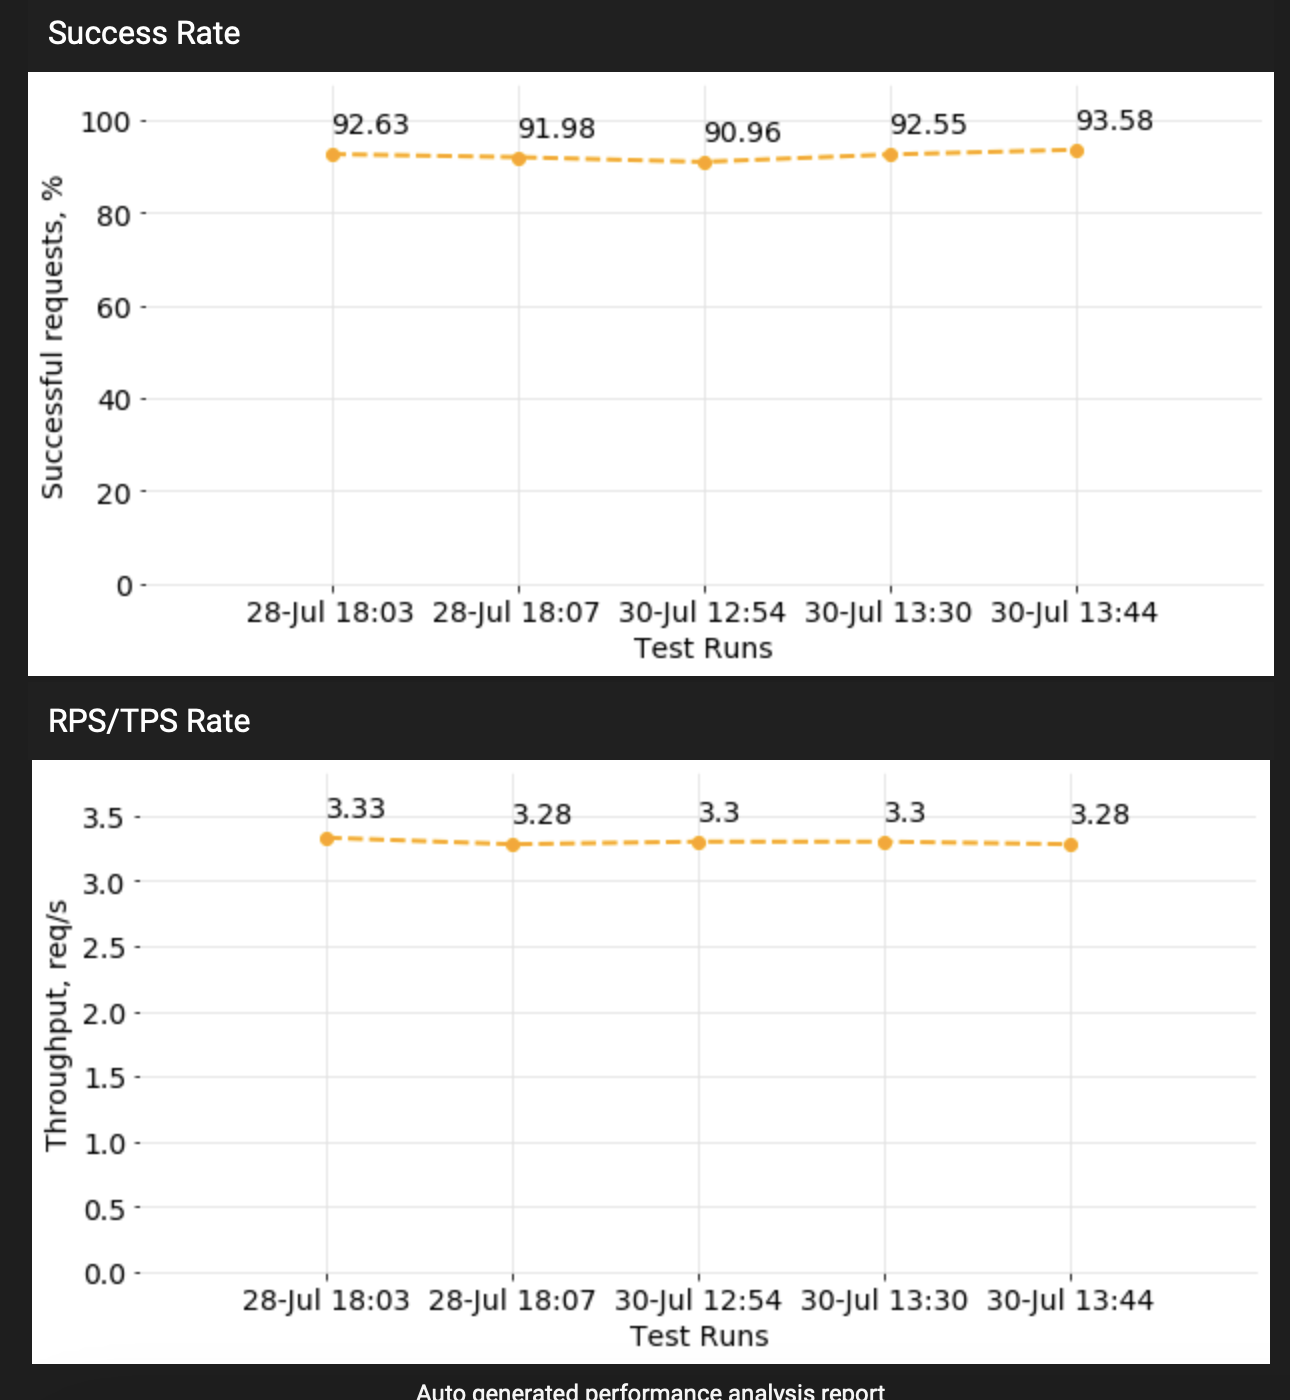
- Inside the email, review the next metrics in comparison to the Baseline:
- Success Rate
- RPS/TPS Rate (throughput)
![Chart Email]()
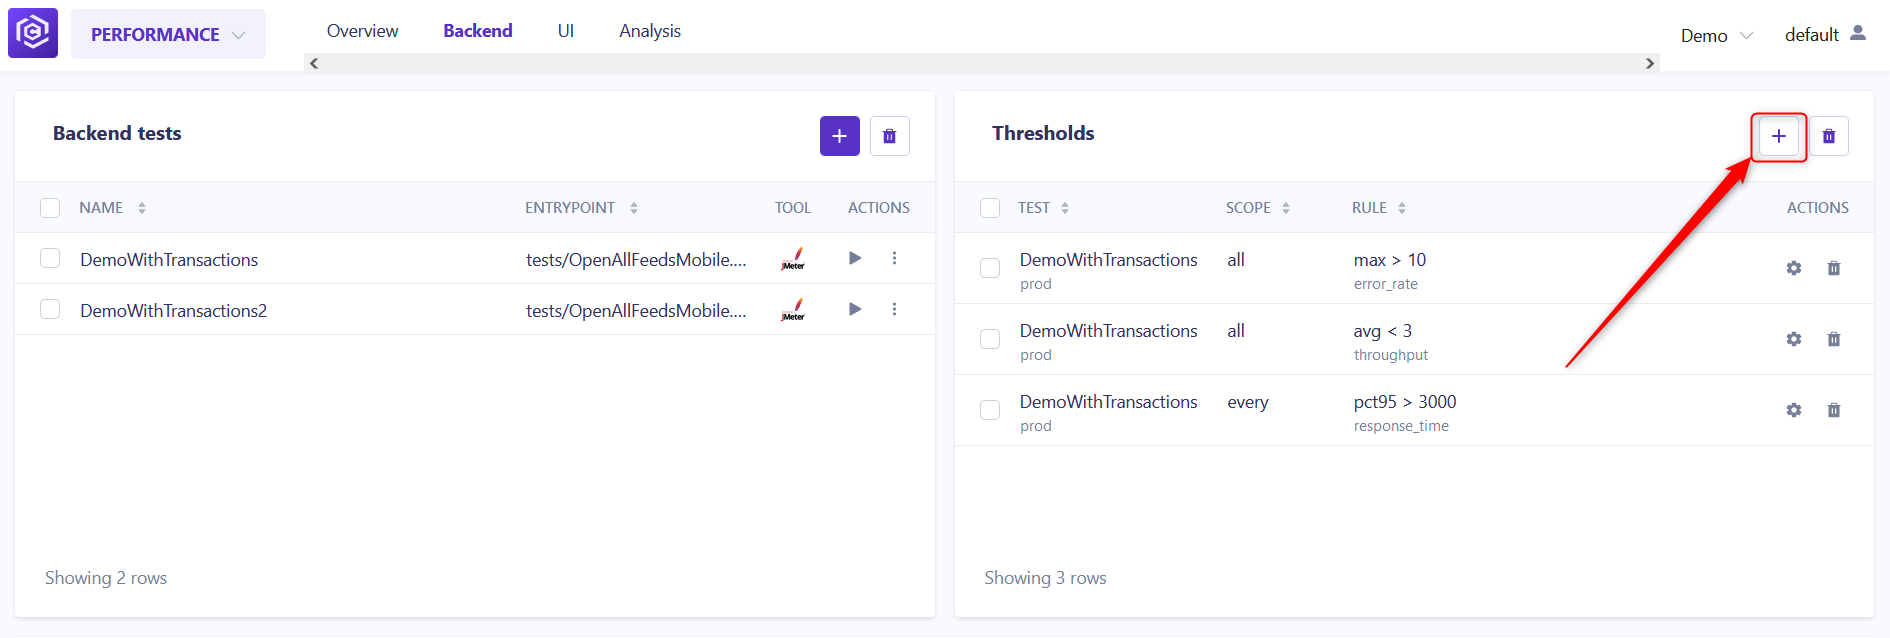
Step 5: Configure Thresholds
- Navigate to the “Thresholds” panel in the Backend tab.
- Click the “+” button to add a new threshold.
![Threshold button]()
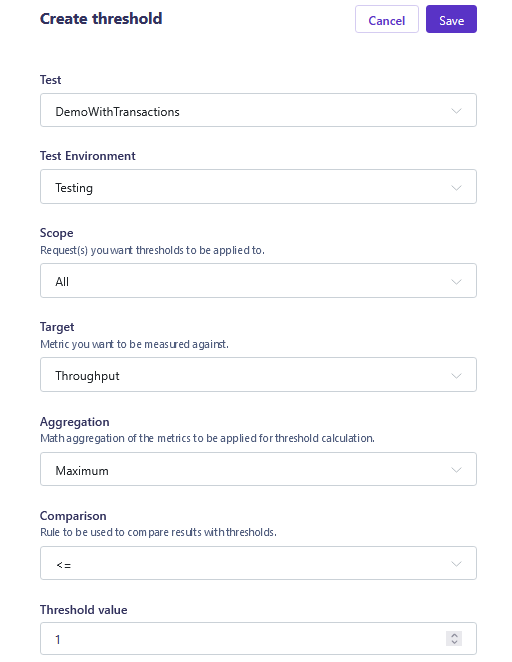
- Fill in the data for the “Throughput” threshold:
- Test: Enter the test name (e.g., “DemoWithTransactions”).
- Test Environment: Specify the environment (e.g., Testing).
- Scope: Choose “All” to apply the threshold to all virtual users.
- Target: Choose the target metric - Throughput.
- Aggregation: Set the aggregation method - Maximum.
- Comparison: Choose the comparison operator (e.g., <=)
- Threshold Value: Set the threshold value for the target metric (e.g. 1).
![Throughput Threshold]()
Note: Using this configuration, maximum throughput should be more than 1 requests per second. If it is less than 1 request, the build will fail.
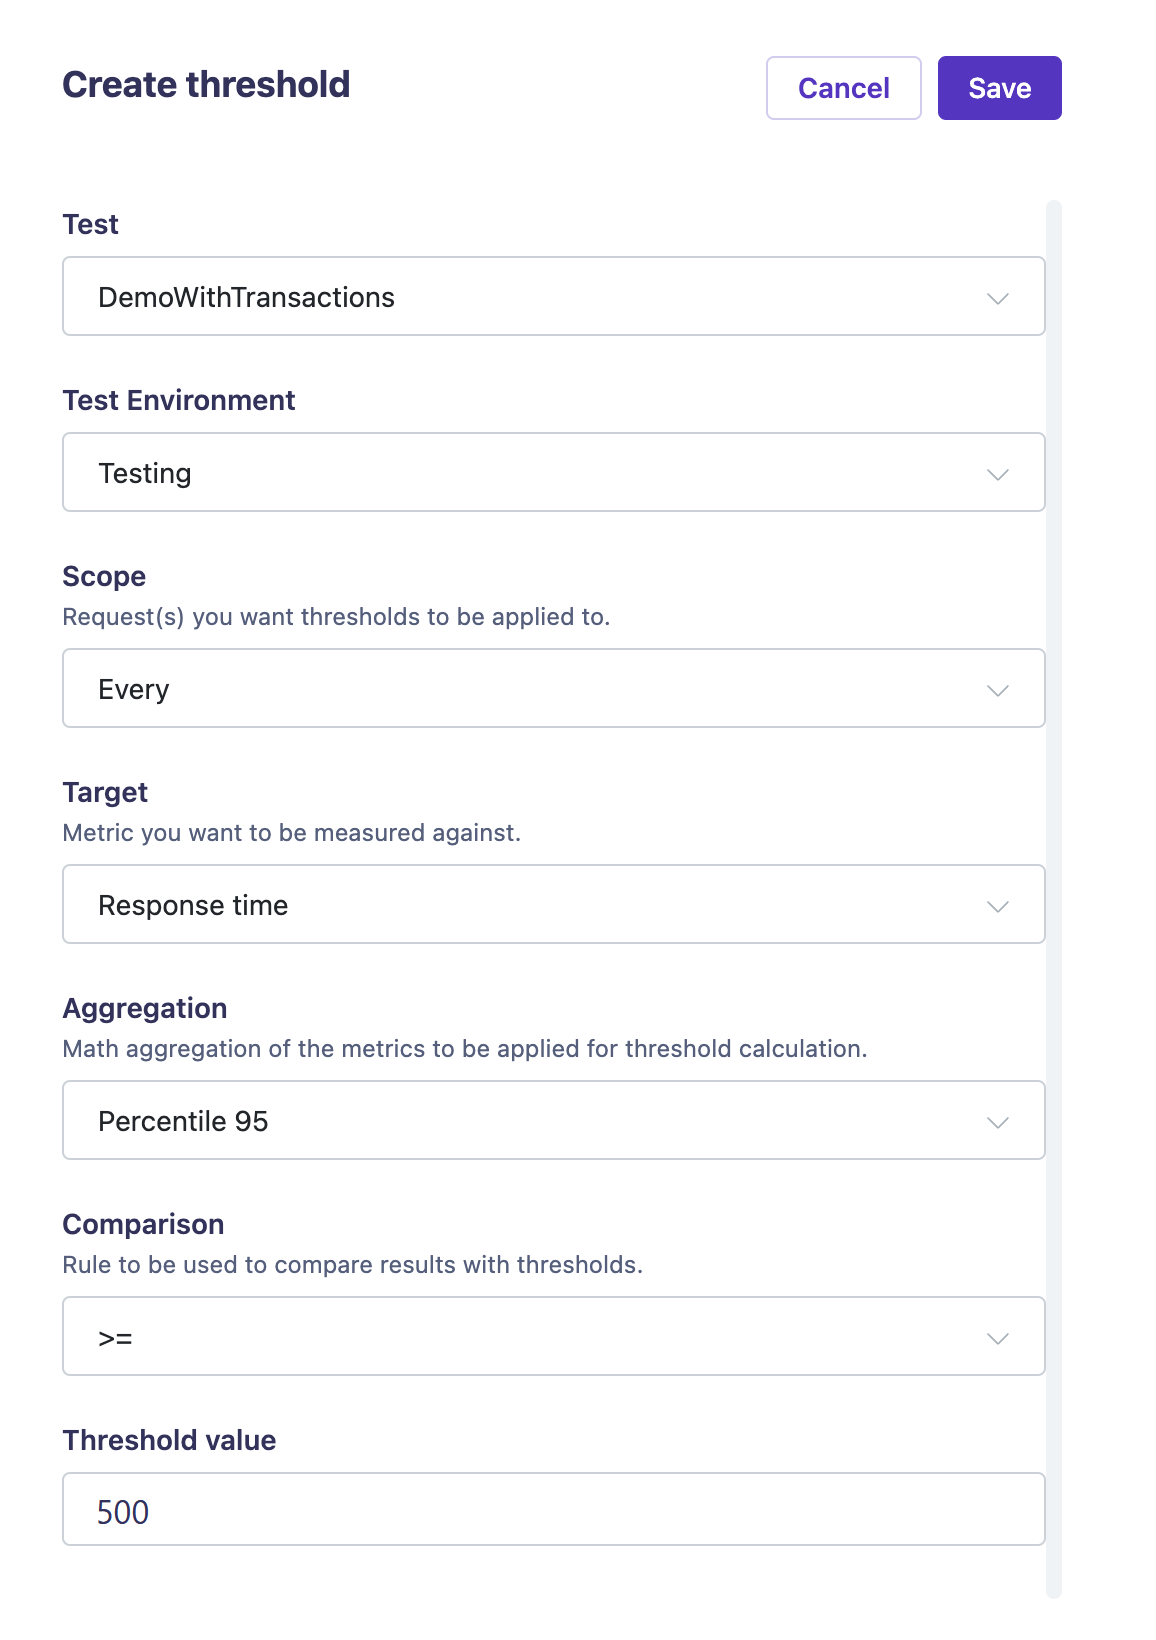
- Fill in the data for the “Response Time” threshold:
- Test: Enter the test name (e.g., “DemoWithTransactions”).
- Test Environment: Specify the environment (e.g., Testing).
- Scope: Choose “Every” to apply the threshold to every transaction in test
Note: The option “Every” in Scope is applicable only for the “Response Time” threshold.
- Target: Choose the target metric - Response Time.
- Aggregation: Set the aggregation method - “Percentile 95”
- Comparison: Choose the comparison operator (e.g., >=).
- Threshold Value: Set the threshold value for the target metric (e.g. 500 ms).
![Response Time Threshold]()
Note: Using this configuration, every request’s response time should be less than 500 milliseconds (0.5 seconds). If it exceeds 500 milliseconds + deviation, the build will fail.
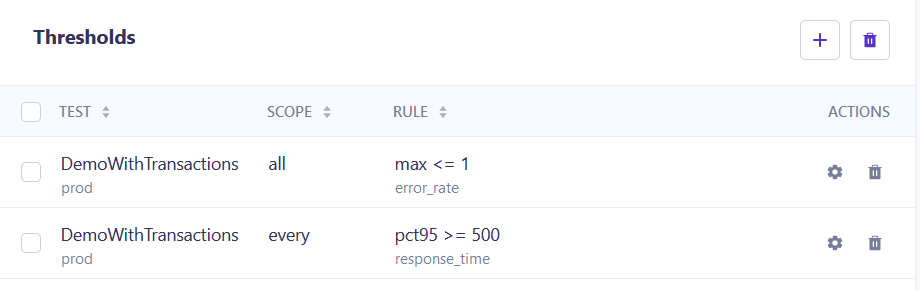
- Click the Save button.
![Thresholds]()
Step 6: Start the Test Run Again
- Click on the “Update And Start” button at the top of the page to start the test run again.
Step 7: Check the Test Result
- Once the test is finished, check the test result in the Carrier UI.
- Verify the status in the UI and the status in the letter to assess if the test meets the configured thresholds and baseline expectations.
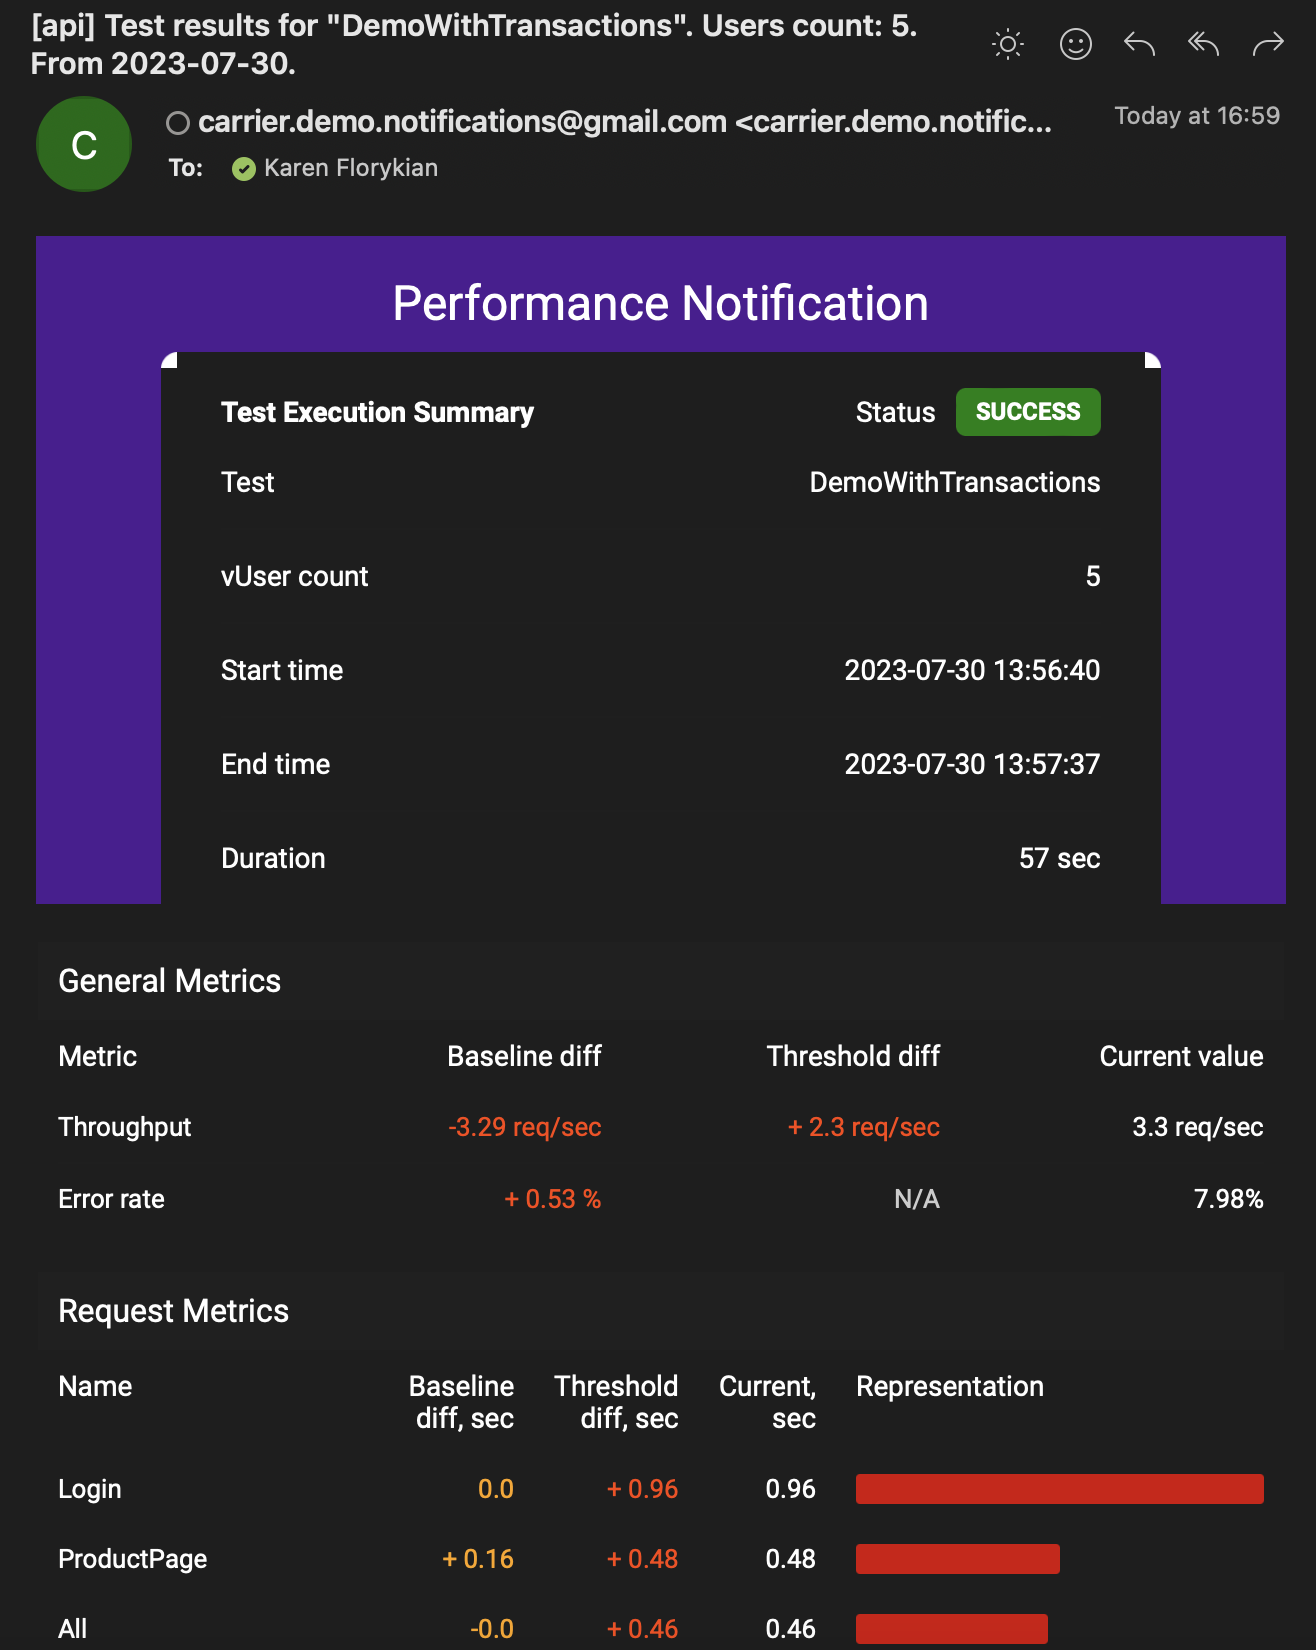
- Email Summary
![Email Summary]()
- Build Status
![Build Status]()
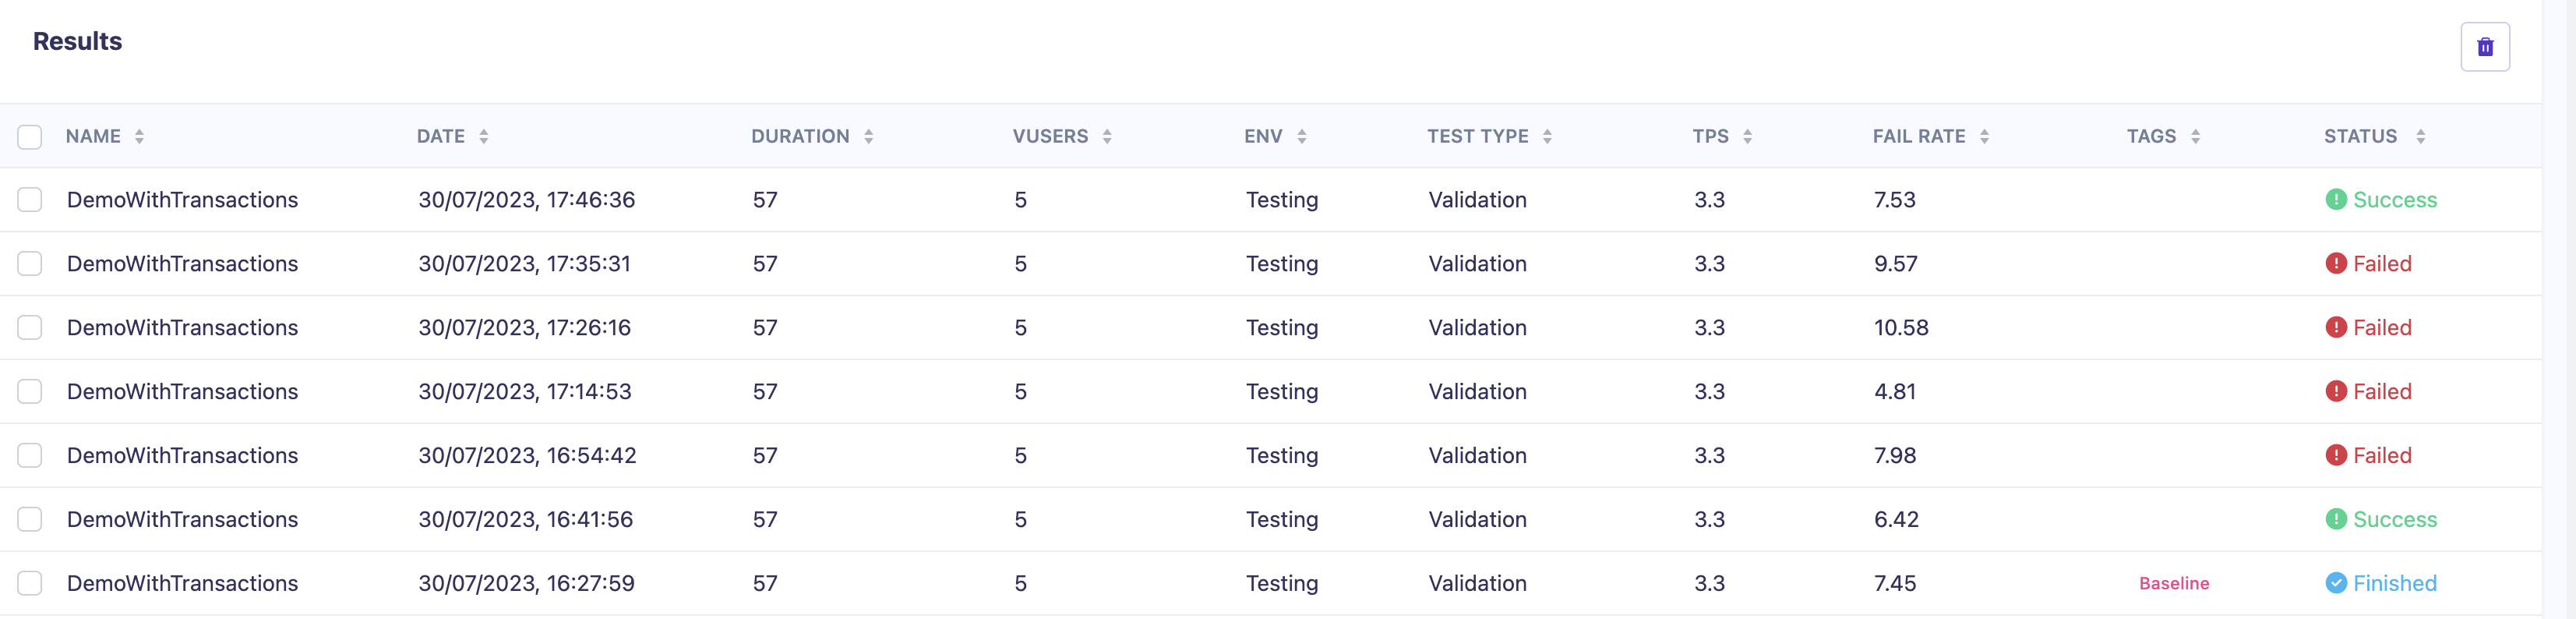
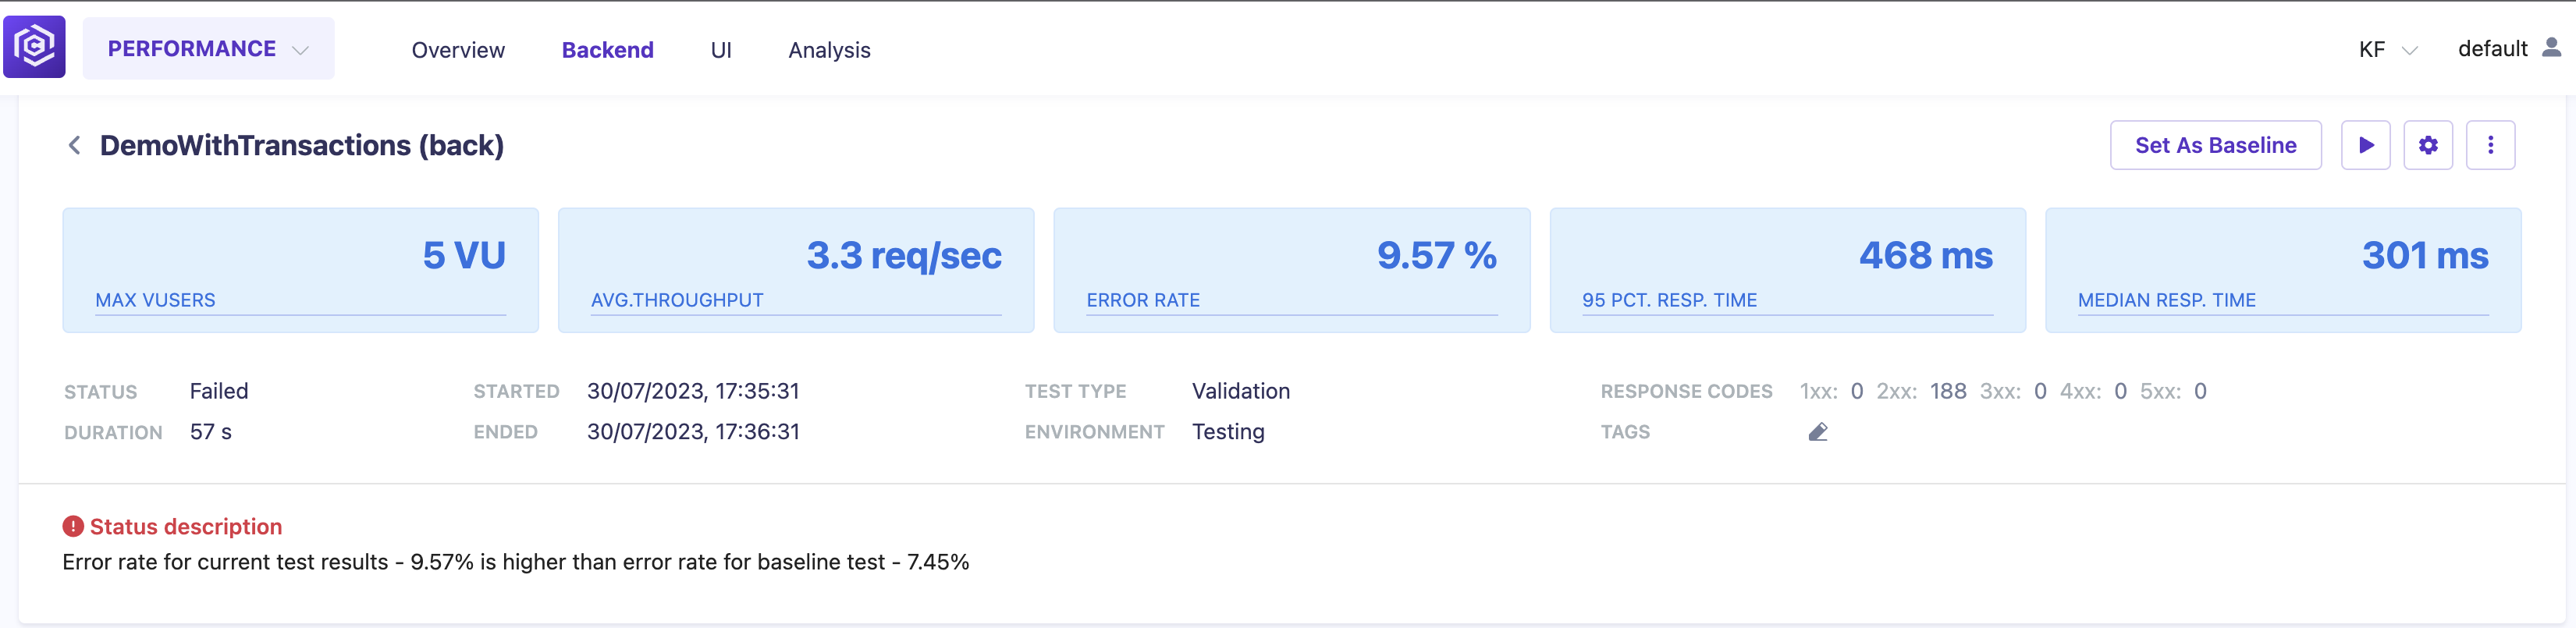
- Report Status
![Report Status]()
- Email Summary

Step 8: Update Thresholds
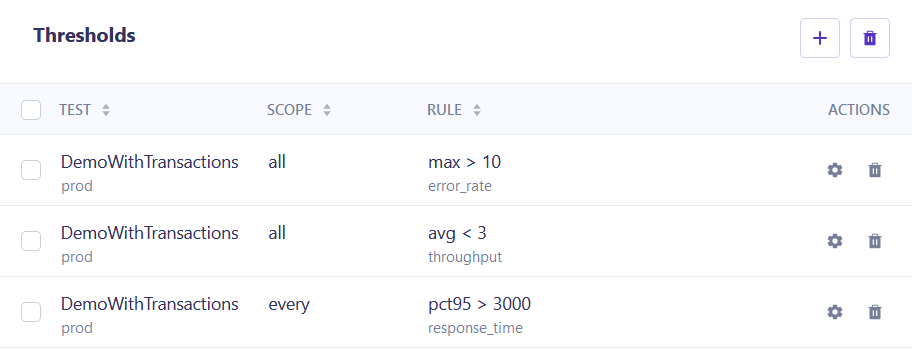
- Set the “Error rate” threshold > 10 (%)
Note: The total error rate should be less than 10%. If it exceeds 10 percent + deviation, the build will fail.
- Set the “Throughput” < 3 requests per second
Note: The total throughput should be more than 3 requests per second. If it is less than 3 requests + deviation, the build will fail.
- Set the “Response Time” threshold value to be more than 3000 (milliseconds)
Note: Every request’s response time should be less than 3000 milliseconds (3 seconds). If it exceeds 3000 milliseconds + deviation, the build will fail.
![Updated Thresholds]()
Step 9: Start the Test Run Again
- Click on the “Update And Start” button at the top of the page to start the test run again.
- Validate results
![Updated Thresholds]()
Step 10: Update Error Deviation
- Open the “DemoWithTransactions” test “Settings”.
- Expand the PROCESSING -> ADVANCED SETTINGS section.
- Set the “Check error rate” deviation value to 5
![Enable Comparison]()
Step 11: Start the Test Run Again
- Click on the “Update And Start” button at the top of the page to start the test run again.
Step 12: Check the Test Result
- Once the test is finished, check the test result in the Carrier UI.
- Verify the status in the UI and the status in the letter to assess if the test meets the configured thresholds and baseline expectations.
- Report Status
![Report Status]()
- Build Status
![Build Status]()
- Report Status
Congratulations! You have successfully configured the comparison. It will help you effectively compare test results with baselines and thresholds, ensuring your application meets the desired performance standards and SLAs.